The VMS Pioneer
-
Boundless Scalability
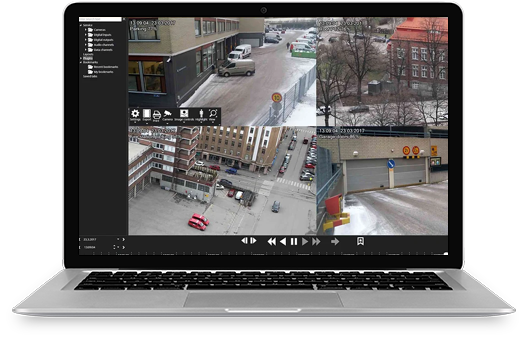
Mirasys VMS software offers high performance with an unlimited number of VMS Servers and cameras managed in a centralized managed network domain.
-
Highly Modular
To meet any user requirement, Mirasys VMS is highly flexible and modular. A user can add additional features with extension packages and applications, such as analytics.
-
Efficient Connectivity
Open platform with support to over 8.000 camera models from all the major camera manufacturers. We offer integrations to a wide variety of 3rd party systems like access control,
Take a Test Drive
Use the
Object Recognition with Filtering
It Takes Seconds to Find and Object - Our Competitors take HoursIdentification Database with Embedded Facial Recognition
Match Faces to IDsObject Detection with Alerting
When Flagged Objects are Detected, Your Team is Notified3D Layouts with Camera/Device Association
Visual Layouts Make Team Members More ProductiveMirasys Architecture
Reliability and Scalability MattersFuture-Proof Platform
Invest in a Platform that Grows with Your NeedsWelcome to our Self Guided Presentation
Click the Arrows at Top Right to Change Screens10,000 Foot View of Company
Video Management System with Embedded AITechnology Partner Screen
Let Us Know if There's an Integration You'd Like us To BuildFacial Recognition - Ranked in Top 1% for Accuracy
Compatible with Your Existing 1080P+ CamerasFacial Recognition Forensic Live Monitoring
Facial Recognition Forensic Live MonitoringSmart License Plate Recognition (LPR)
Find Plates of Interest within SecondsObject Recognition with Filtering
It Takes Seconds to Find and Object - Our Competitors take HoursIdentification Database with Embedded Facial Recognition
Match Faces to IDsObject Detection with Alerting
When Flagged Objects are Detected, Your Team is Notified3D Layouts with Camera/Device Association
Visual Layouts Make Team Members More ProductiveMirasys Architecture
Reliability and Scalability MattersFuture-Proof Platform
Invest in a Platform that Grows with Your NeedsWelcome to our Self Guided Presentation
Click the Arrows at Top Right to Change Screens10,000 Foot View of Company
Video Management System with Embedded AITechnology Partner Screen
Let Us Know if There's an Integration You'd Like us To BuildFacial Recognition - Ranked in Top 1% for Accuracy
Compatible with Your Existing 1080P+ CamerasFacial Recognition Forensic Live Monitoring
Facial Recognition Forensic Live MonitoringSmart License Plate Recognition (LPR)
Find Plates of Interest within SecondsSEE OUR AMAZING VMS LIVE
We'd be happy to show you a live demonstration of the Platform at a time that is convenient for you and your team.
Why is
MIRASYS Special?
Spotter is our windows based thick client and provides the user with an extremely intuitive experience. It allows the user to access cameras throughout an entire federated system.
Established in 1997 Mirasys has provided an extremely OPEN video managment platform for nearly 3 decades. Our customers fuel our R&D resulting in a user friendly result.More Protection at Your Fingertips
-
Support for over 8000 Camera Models
-
Deep 3rd Party Integrations
-
Open Hardware DAS, NAS, SAN Etc.
-
Home Baked Deep Vision AI including Edge AI, and 3rd Party
-
Easy to use management and client applications
-
Enhanced Security from Edge to Server and from Client to Server
New Camera Features Unlocked
The Mirasys engineering team is on the forefront of camera innovation. We continue to integrate deeply into the newest generation of cameras and their unique capabilities.
-
Edge AI & Deep Learning
All camera manufactures are in the AI race to provide the most value from the edge. With the introduction of ONVIF Profile M, Mirasys with the release of 9.7.0 and later offers the ability to store, process, and alarm off of this edge data. -
Edge Audio Management
With onboard or external microphones connected to IP cameras or Encoders Mirasys can manage these audio streams to record and allow operators the ability to listen through the Spotter Client. Many camera manufacturers also offer analytics for the audio streams that Mirasys can leverage from detection for alarms such as gunshot, aggression, whispering, and etc.

-
Multiple Stream Management
With all kinds of network limitations that can exist; Mirasys allows up to 3 streams to be individually managed from within our VMS. Each stream can have specified bitrates, frame rates, and resolutions to accomplish the best result for live monitoring. These streams can also be used from the server as an outbound RTSP stream for integration with 3rd party systems. -
Digital Input/Output Management
Most cameras come with alarm inputs and relay outputs, outside of cameras Mirasys also support Moxa LAN based I/O devices. When adding a camera or I/O Module Mirasys will allow these digital I/O to be used as triggers and actions for alarms within the software. The inputs and outputs can be pulled over next to camera views to monitor status or even control the relay output functions for both manual and automated control.
Trusted By
World Leading Brands & Organizations
Enterprise Ready
Monitor a single site or hundreds of locations.Mirasys is highly scalable, allowing the Spotter VMS to grow with your business. If you add new stores, warehouses, schools, casinos, or entertainment venues, the platform is designed to handle it.


Integration Friendly
Security & Surveillance Teams require certain 3rd party tools that work for them. We think you should get what you ask for.Mirasys is a completely open system. If we don't already work with the 3rd party camera, application or component that you require, we will do our very best to accommodate your needs.
Request a Demo
Our team is looking forward to assisting you with your VMS mission. Complete the form below and we'll respond within one business day.
Latest News & Articles
-
20 May
The True Burden of Traditional Video Surveillance Software on Companies
Video surveillance systems have become a standard feature of security infrastructure for small, medium, and large businesses alike. From discouraging theft to observing operations, the place of surveillance cameras is unquestionable. Video Surveillance Camera Software (VMS) has been credited with making these systems smarter, more efficient, and easier to handle for many years now. But […]
Read More -
30 Apr
TOP 7 AREAS TO CONSIDER WHEN DEPLOYING A SUCCESSFUL FACIAL RECOGNITION SYSTEM
Facial Recognition Deployment Guide Link to Article: https://www.linkedin.com/pulse/facial-recognition-deployment-best-practices-mirasys-usa-zmpze/ Here is a snippet from the main article: Your Use Case(s) will help create the blueprint for your Facial Recognition system design. Before deploying a Facial Recognition solution, it’s best to discuss the potential use cases with your fellow department heads and technology team. There may be […]
Read More


